Tuesday, May 5, 2015

Lemming Lacquer Swatch

Hey there everyone! Sorry I've been gone for a while. I didn't have anything exciting to blog about. But I'm back! 

Today I have two swatches from Lemming Lacquer. I found this indie shop browsing though Instagram one night. She was about to launch the next day so I checked out her page and got really excited. This collection is Alice in Wonderland theme. It's called Curiosties From Wonderland. 

Two of her polishes caught my eye. Those two were Ravens & Writing Desks and Drink Me. These are jelly based polishes filled with different types of glitter. 

I love how cute the packaging was when I received my order. Very well wrapped to keep everything safe. The card adds a personal touch.


Don't they look so pretty?

First up is Ravens & Writing Desks. This is two easy coats plus Seche Vite top coat. Very easy to apply. I barely had to do any clean up. 

Another angle. You can see it's not too thick.

A macro.

And I love how jelly polishes look matte so I had to make it matte.

Different angle.

Macro.

And a macro of Ravens & Writting Desks stamped with MPolish Sweetclover.

Macro bottle shot. Ok I'll stop now, on to the next swatch.

Here's Drink Me. Two easy coats plus Seche vite top coat. I totally want to drink it! I would've never thought I would ever say a polish looks delicious but I've said that a few times. 

Macro of Drink Me. 


You know I had to matte this one too!

Macro of Drink Me matte. I used NYC matte me crazy. 
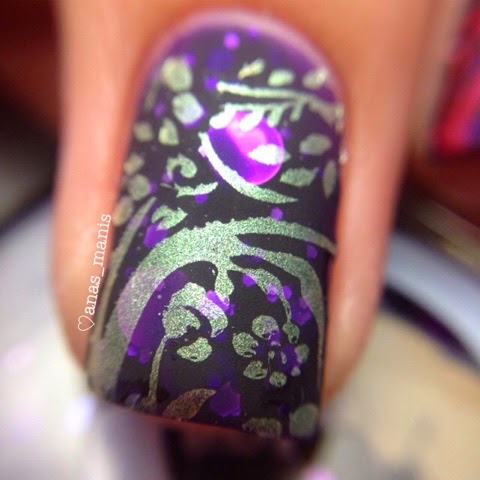
And I stamped over it too with MPolish Sweetclover.

And last photo. Macro bottle shot of Drink Me.

So what did you guys think of these polishes? I know not everyone is a fan of these types of polishes and that's ok. If you do like these make sure to check Lemming Lacquer on Instagram. Her shop link is in her bio. 

Thank you for reading. See you next time.


**everything was bought by me. All opinions and reviews are my own.


Monday, April 6, 2015

OPI Infinite Shine swatches

Hey lovelies! 
Today I have swatches of O.P.I Infinite Shine gel effects lacquer system. The 3-step system includes primer base coat, a lacquer, and gloss that cures like gel polish with no light required. They say it can last up to 10 days with out touch ups. 

I can't compare them to other gel polishes since I've never used them before. Also as a polish addict I don't wear polish for longer than 2-3 days.

I received this package from O.P.I as part of the #PreenMeVIP program.
I don't know how or why I was chosen to receive this package from O.P.I and Preen.me but I'm very happy I was!

Here's a little collage of the swatches. There's 30 available shades and I was sent 10 shades and the primer base coat and gloss top coat.

The polish came in this cute little box.

My kit included 
Raisin' the bar
Unrepentantly red
Girl without limits
In pursuit of purple 
Endurance race to finish
You can count on it
Staying neutral
Strong coal-ition 
Brains & Bronze
To infinity and Blue-yond 

This is Brains & Bronze. Two easy coats no top coat. Look how shiny it is with out the gloss top coat! It's sort of a caramel color. 

This is Strong Coal-ition. Two easy coats no top coat. I love it!

This one is Staying Neutral. Again two easy coats no top coat. 

Next up is You can count on it. Two easy coats no top coat. Very pretty color and so shiny!

Here is In pursuit of purple. Two coats no top coat. Very pretty color, awesome application!

Raisin' the bar. Two coats no top coat. This one I had to be careful not to get it too close to the cuticule because it stains. I scrubbed with some whitening toothpaste and it worked a little. Beautiful color though.

This one is To infinity and blue-yond. Two coats plus the gloss top coat. I tried this one first and I wanted to do something fun. I wore it for three days no chips, or tip wear at all. That's pretty good. Like I said before I usually don't wear the same polish for more than a day or two.

This one is Girl with out limits. Two coats no top coat. Awesome formula. I feel like I have this pink somewhere in my pink polish drawer. 

Endurance race to finish. Again two coats no top coat. Love the color! I'm usually not drawn to oranges but I love this shade!

Last one is Unrepentaly Red. Once again two coats no top coat. Could've used one more coat since there's visible nail line. This one also stains the skin so I tried to be careful with it.


Overall I love the colors. Some are ones I wouldn't buy for myself so I'm glad I got a chance to try them. Formula is amazing as it usually is with O.P.I. I've never had problems with the ones I have. I'm a big O.P.I fan! These are great if you aren't able to change your polish often. 

Hope this was helpful. Have you tried gel polish? What do you think of it? Will you try O.P.I gel lacquer system? Any favorite colors? Leave your comments below. 


Thank you so much for reading! 


**items are a press sample sent for review. Review and opinions expressed are my own**


Monday, March 30, 2015

Nail Foil Bornprettystore review

Hi loves!

Today I'm re-reviewing some nail foil that was sent to me from Bornprettystore. I say re-reviewing because when I received it I was such a newb and really had no idea how to use it. I tried it and it was a giant fail. I saw a different method a couple months ago (totally forgot by who) and decided to try it. 

Here are the items I used.
Nail foil item #17231 
China Glaze X-ta-sea
Seche Vite top coat
A cuticule pusher
And a clean up brush

It looks like this in the little jar.


Take it out and cut a piece a couple inches in length. I think this one was about 5-6 in.

Flip it over to the non shiny side.

Apply your desired color polish in squares a little bigger than your nail.


And then we wait.


...keep waiting.


I waited about an hour. It's best to do this a day ahead so you won't be waiting around on the day you want to use it.

Once it was dry I kind of marked my "suare" and with the other end of the cuticule pusher I started peeling the edges carefully.

Look how pretty!

Apply a thin coat of the polish you used on the foil to your nails. It doesn't have to be perfect.


While it still a bit tacky apply the square you peeled to the nail. With the end of the cuticule pusher go along the edges and the cuticule to cut off the extra.


Tidy up with your clean up brush and topcoat. Sorry this photo is a bit blurry.


Tada! Final result! I love it! So perfect for spring.

And here's macro :)

And another one just because :)

I hope this helps someone. I think this is perfect for foils that have designs on them. What do you guys think? Will you be trying nail foils if you haven't already?


This was item #17231 from Bornprettystore.com
You can use my code SMPX31 for 10% off your order (excludes sale items).


**this review is based on my honest opinions**


Friday, March 27, 2015

Delush Polish Spring

Hey there lovelies!

Today I have three swatches from Delush Polish Spring to Conclusion Collection. They are so pretty!!


They look like delicious frosting with sprinkles in a bottle! Very Springy!
Left: A Peony for Your Thoughts
Middle: Springing in the Rain
Right: 50 Shades of Yay


We'll start with 50 Shades of Yay. This was three thin coats plus top coat. A white crelly polish filled with neon colored glitters. It has circle glitters varying in sizes and some small hex glitters. 
I don't know if it was my application or the formula but I had a bit of trouble getting some of the glitter on the brush. I had to fish out the circle glitters. I think if I had placed it upside down for a bit I wouldn't have had that problem. Overall I love this polish!
Here's a macro shot. Excuse the little air bubbles :)


Next is Springing in the rain. Three thin coats plus top coat. Blue crelly polish filled with matte white and pink hex glitter and pink, purple, white circle glitter in varying sizes. I love this blue! The glitter in it makes it so fun!


Last is my favorite one. A Peony for Your Thoughts. Three thin coats plus top coat. A pinkish crelly filled with hex and circle glitter in varying sizes. I love everything about this one! So fun, so springy and girlie!

And a macro :)


I loved this half of this collection and now I want the rest of them! So pretty! Have you tried Delush Polish? Do you have a favorite from this collection? 


I got a sample size cuticule oil with my order. I haven't tried that yet but it smells very yummy! Can't wait to try it!


*everything bought by me unless stated otherwise


Saturday, March 21, 2015

Nautical nails

Hello lovelies!

Today I have for you some nautical nails. 


I wasn't sure what colors to use. I remembered I had gold star studs so I went with gold and navy colors for my design.

I used OPI Yoga-ta get this blue
Sally Hansen Xtreme wear Golden-I
Seche Vite fast drying top coat
Anchor and straight vynils from Glammymani.com
Clean up brush from Joliepolish (etsy)

Here's a little pictorial
1) I apply the vynils to all my nails first. That makes it easier for me and I'm not afraid of smudging any nails.
2) apply polish over vynil and then carefully but quickly remove it. Do this with all your nails.
3) apply top coat
4) apply anchor vynil on desired nail
5) apply desired color over it and carefully remove anchor vynil
6) top coat and clean up
7) apply studs if you like and done :)


There's a quick tutorial on my Instagram @anas_manis if you'd like to see it.

So what do you think of this design? Hope you like it.