Saturday, December 26, 2015

Zoya Whispers Press Release

**Press Release**


SIX NEW TRANSITIONAL SHADES 
ZOYA WHISPERS

Experience color serenity with this muted and tranquil palette of transitional nail neutrals.


·      Cala - ZP823: A soft nude with a kiss of warmth that will flatter most skin tones. 
·      April - ZP824: A light, rosy toned neutral that is a modern take on blush. 
      ·      Eastyn - ZP825: A subtle grayed grape that is more interesting than mauve and

gives a modern alternative that is ever so wearable. 

      ·      Misty - ZP827: An easy to wear taupe that is an updated version of gray with

just a touch of green to make it daring. 

      ·         Ireland - ZP826: A uniquely wearable green that is muted enough to make it subtle

yet still interesting. This green is well balanced between blue & yellow so it’s
flattering on all skin tones. 

     ·         Lake - ZP828: A softened blue that gives the effect of serene water with just a

hint of vibrancy to preserve its luminosity.


AVAILABLE FOR PRE-ORDER on ZOYA.COM 12/28/15
ZOYA IS THE HEALTHY COLOR OF FASHION!
$9 (US)
Available in top salons, spas and on zoya.com
 **BIG5FREE, TOXIN FREE: Zoya Nail Polish Formula contains no formaldehyde, formaldehyde resin, dibutyl phthalate, toluene or camphor.

**press release**


I'm excited about these shades! Are you? Let me know below.

Thanks for reading ;)

Tuesday, December 22, 2015

Poinsettia Nails

Hey my friends!

I've got my last Christmas/holiday mani to share with you guys today. I haven't done Poinsettia nails so that's what I went with. Take a look below to see how I created this mani.

Poinsettia image Uberchic Beauty

I used two coats of Envy Lacquer Apple Pucker on thumb, index and pinky and did some subtle dots along the side. On my middle and ring finger I used two coats of Bonita Nail Lacquer Golden Girl. I topped everything with one coat Seche Vite top coat.

For the Poinsettias I used Uberchic Beauty Christmas-01 stamping plate. I used the advanced stamping technique (I think that's what it's called), where you pick up the stamp and fill in the image on the stamper and then stamp it onto the nail. 

Take a look at these quick photos. I'm sorry I had to use flash.

Picked up image

I stamped with Sinful Colors Black on Black.

Filled in image

I filled in the image with Envy Lacquer Apple Pucker and Berry Pop using a dotting tool. I waited for it to dry a bit and then stamped it onto my nail. I went along the edges with an orange stick and then picked up the excess with tape. I cleaned up a bit with a brush with acetone and applied two thin coats of Seche Vite to smooth everything down. I did the same for three more nails. 

Poinsettia macro


I really liked how this mani came out that I wore it for two days. I've been wearing my manis a bit longer than just a day now. 

Hope you guys enjoyed this look. Let me know if you've tried stamping this way before or what your preferred method of stamping is.

Happy Holidays!


**some items provided for review**

Read my review of Envy Lacquer Fall Rock Candy trio HERE.

Friday, December 18, 2015

Marbled Peppermint Nails

*Nothing to disclose*

Hey lovelies!

So sorry I haven't been blogging as much. I promise I'll get back to it after the holidays are over.

Today I have some peppermint nails using the dry marble/drag art technique. These were originally inspired by Karen from pishposhpolish.com. I got out my polishes to recreate her candy cane design, which you can see here, but then I remembered seeing some peppermint cookies on Pinterest and did that instead.

Take a look at the final result.
marbled-peppermint-candy-nails
Marbled peppermint nails
Polish pictured OPI Solitaire

Not every nail came out the same but I loved these! I wore them to my daughter's holiday party.

Seche Vite top coat, OPI Pussy Galore, OPI Solitaire, Zoya Chyna

Here are the polishes I used:
OPI Solitaire
OPI Pussy Galore
Zoya Chyna
Seche Vite top coat
Nail art striper brush from BPS

I did one coat of OPI Solitaire and let it dry. Then I went back and did a second coat. I added some drops of the red and pink polish to my DRK Mat and with the striper brush I quickly drew some vertical lines on my nail. I cleaned off my brush and alternated some horizontal lines to make the marbled look. I let everything dry for a bit and then did one coat of Seche Vite top coat.

You have to do one nail at a time and work quickly or else your polish will dry. You don't want it to dry while you're working or you'll pull the polish too much.

Here's a macro of one nail so you can see the design a bit better.
macro of ring fingernail


And here is the inspiration photo. Don't these look yummy?!!

Peppermint cookies


What do you guys think of this look? I hope you guys like these like I do!
I think I'll be trying to make those cookies as well!


Thanks for reading!


Monday, December 14, 2015

Zoya Mystery Box review

Hello beauties!

I received my Zoya Mystery Box from cyber Monday last week and I've got a review on all the goodies that were in it. 

Are you ready? Let's get Started.

Zoya mystery box

Box contents:
Naked Manicure (full size base and top coat, mini pink perfector)
Mini remove (2oz)
Redbook trio (Marjorie, Cindy, Renee)
Qtica Intense lip repair balm
And a 50% off coupon that was sent in an email.

Naked Manicure

Remove and Redbook trio

The lip balm is very moisturizing. It's thick and has a light scent. On the lips it feels minty and it's not sticky. I'll be using it a lot since my lips get very dry and I can't use Chapstick.

Qtica lip balm


Below I used the Naked Manicure set. I don't see much of a difference with just the Pink Perfector, so it looks like I will be getting the Lavender Perfector and the sheer white Tip Perfector as well because my nails are a bit yellow from polishing so much. Sometimes I don't want to wear colored polish so this will be great for that.

My bare nails no basecoat

With Naked Manicure set

I applied the Naked Manicure base coat, one coat of the Pink Perfector and topped it with the Glossy Seal top coat. What do you guys think?

Now onto the swatches of the trio, Cindy, Marjorie, and Renee. 


First up is Cindy
zoya-cindy-swatch
Cindy three coats plus top coat

Cindy, swatch shows three coats over the Naked Manicure base plus top coat. Cindy is described as a sheer glittering gold.
I prefer this one with just two coats. It's so pretty and I love the hex glitters in it.

Cindy macro


Marjorie
zoya-marjorie-swatch
Marjorie two coats plus top coat

Marjorie, swatch shows two coats plus top coat. Marjorie is described as a plum metallic with subtle shimmer.
Formula is great, very smooth and self levels really well. It's gorgeous! The shimmer in it reminds me of the Ignite Fall collection from 2014.

Marjorie macro indirect light


Marjorie macro direct light


Last up is Renee
zoya-renee-swatch
Renee one coat plus top coat

Renee, swatch shows ONE coat plus top coat. Renee is described as a cherry red creme.
Formula is great! So smooth and easy to work with. It was opaque enough for me in just one coat. If you're used to doing thin coats two coats would be perfect.


And here is Cindy over Renee.
Cindy over Renee

I did one coat over middle and ring and a glitter gradient on index and pinky nails plus top coat.

Cindy over Renee macro


Overall I really liked this mystery box and I'm happy I bought it. I got things I wanted to try and the polishes are really pretty. For the price this was a great box!

What do you guys think? Loved it? Didn't care for it? Let me know below.


The Redbook trio is available at zoya.com and I've heard you can get them individually at Ulta.


Thanks for reading! Happy polishing!


Click to stay connected with me ;)


**purchased by me**

Monday, December 7, 2015

Holiday Ornament Nails

Hey lovelies!

Happy first day of the week! Yay! Lol

Today I have some holiday ornament nails for you. I was browsing Pinterest for ideas and ran into this cute wallpaper. I decided to recreate it on my nails. Below is the final look. I actually did these a couple days ago. Right before my middle nail broke again :(

holiday-nails
Christmas ornaments

I did a blue to purple gradient base and drew some tree branches, oranaments and snowflakes over it. 

Middle nail macro


Image credit Pinterest

This is the inspo wallpaper I found on Pinterest. It looked so pretty! I ended up doing the gradient the opposite way.

Blue gradient

Here is the base before drawing in the snowflakes, branches and ornaments. I totally forgot to take a photo before adding the dots! 

I used two shades of blue and a light purple for the gradient and topped it with one coat of fairy dust. The gradient got completely covered by all the nail art! :( But I loved the result!

What do you guys think of this look? Hope you guys like it!

Thank you so much for reading! Happy polishing! :)

Click to stay connected with me :)


Wednesday, December 2, 2015

Holiday Bling Nails!

Hi my loves! 

Can you guys believe its December already? My birthday month! 

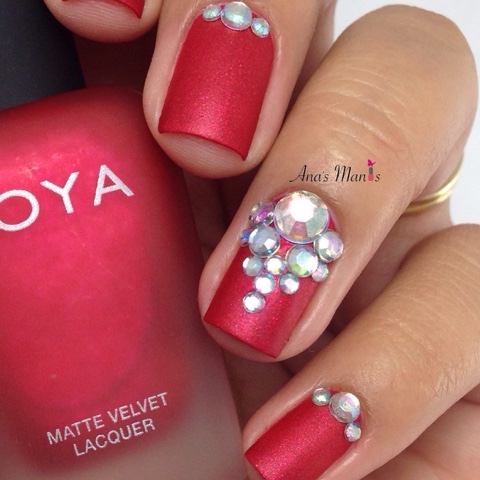
Christmas is getting closer so I have these holiday blingy nails to show you guys. I was sent these shiny rhinestones from Bornprettystore to review (item #21586) and I actually couldn't think of how to use them at first but I loved the end result! Keep reading after the break to see what I did with them.


Item #21586

These rhinestones are really pretty. They're very shiny and sort of multi-colored and they come in different sizes, which I really like!

I used two coats of Zoya Amal from the Matte Velvet Holiday 2015 collection without top coat as my base. Then I looked for the two smallest sizes for three of my nails. I added a bit of matte top coat near my cuticle where the rhinestones were going to go. I added three to each nail except the ring finger. I had no idea what I was going to do with that one!

I added some matte top coat and just started adding the rhinestones. I was going for a necklace type look I guess. 

zoya-matte-velvet
Zoya Amal

Here is the finished look. I loved it! I didn't add any top coat over the rhinestones. If I wanted to wear this for more than a day I would've just added more top coat when placing them. That works very well for me  and I'm very rough with my hands. I think these will be my Christmas nails!

Bornprettystore item #21586

No macro but here's a closer look at my ring finger. I was very pleased with it.

Bornprettystore.com item #21586


zoya-matte-velvet-holiday
Zoya Amal zoya.com
Bornprettystore rhinestones

I was having so much fun photographing this mani! Lol Seriously loved it! I love blingy nails!

Get your own blingy rhinestones here! Don't forget to use code SMPX31 for 10% off regular priced items. Bornprettystore.com has free shipping world wide!

Read my Zoya Matte Velvet review here.


Thank you so much for reading! Happy polishing ;)


Click to stay connected with me :)


Monday, November 30, 2015

Zoya Cyber Monday Holiday Deal

**press release**


Get ready… our Super Cyber Monday Holiday Deal is a… (insert drumroll)… MYSTERY BOX!

        
THE MYSTERY BOX IS BACK!
If you love surprises, the MYSTERY BOX deal is for you - you'll get a box filled with some of our favorite products ($72 value) for just 
$20 plus free shipping yourself or someone else with a great deal AND great products!

Wondering if it’s worth the gamble? Last year the Mystery Box was a huge hit – make sure not to miss out on this one day only offer. We promise, it won’t be the same as last year, it will be better!

Here are a few blog reviews from last year…nouveau cheapmodel citypolished with pizzazz. As you can see the box was loaded with Zoya and Qtica goodies!

MYSTERY BOX available exclusively on 
ZOYA.COM
CYBER MONDAY ONLY (11/30/15).

Please note - This deal includes free shipping to Canada but will need to use code: CYCN

Sunday, November 29, 2015

M Polish To Have and To Holo/ Frost comparison

Hi lovelies!

Today I have a comparison post of M Polish stamping polishes, To Have and to Holo and Frost. 

To Have and To Holo was the first holographic stamping polish released to the public by M Polish. Frost is from the Winter 2015 Collection, see my review here. You might be debating whether you need both or not. In my opinion you need both because they're not the same.

To Have and to Holo is a linear holographic stamping polish while Frost is a holographic polish with scattered platinum microflakes throughout. It can also be worn as regular polish.

My swatch below shows To Have and to Holo stamped on index and middle nails. Frost is stamped on ring and pinky nails. Both are stamped over one coat of Salon Perfect Oil Slick (black). Excuse the awkward hand pose!

Index & middle: THATH  Ring & pinky: Frost
Direct light
Index& middle: THATH  Ring & pinky: Frost
Indirect light 
To Have and to Holo macro
Frost macro


You can really see the difference between the two. I think they're different enough to have both. They're both gorgeous! To Have and to Holo I purchased myself as soon as it was released because holo! What do you think of these?

M Polish will be restocking THATH and other collections for cyber monday so don't miss out! The Spring Collection will be retiring so get those before they're gone! You can see my swatches of the Spring Collection here. Warning I was still a newb at blogging and swatching back then! lol


Thank you for reading! Happy stamping :)


Click to stay connected with me :)